在WPF中使用PlaneProjection模拟动态3D效果
虽然在 WPF 中也集成了 3D 呈现的功能,在简单的 3D 应用中,有时候并不需要真实光影的 3D 场景。毕竟使用 3D 引擎会消耗很多资源,有时候使用各种变换和假的阴影贴图也能设计出既省资源,又有很好用户体验的“伪”3D 界面。
在 Silverlight 中,因为性能问题,一般并不使用真 3D 引擎,微软为 Silverlight 提供了 System.Windows.Media.PlaneProjection 类,用投影变换来模拟 3D 的效果。
下面让我们看下一个 Microsoft Expression Blend 4 提供的示例 Wall3D (位于帮助>欢迎屏幕>示例)。
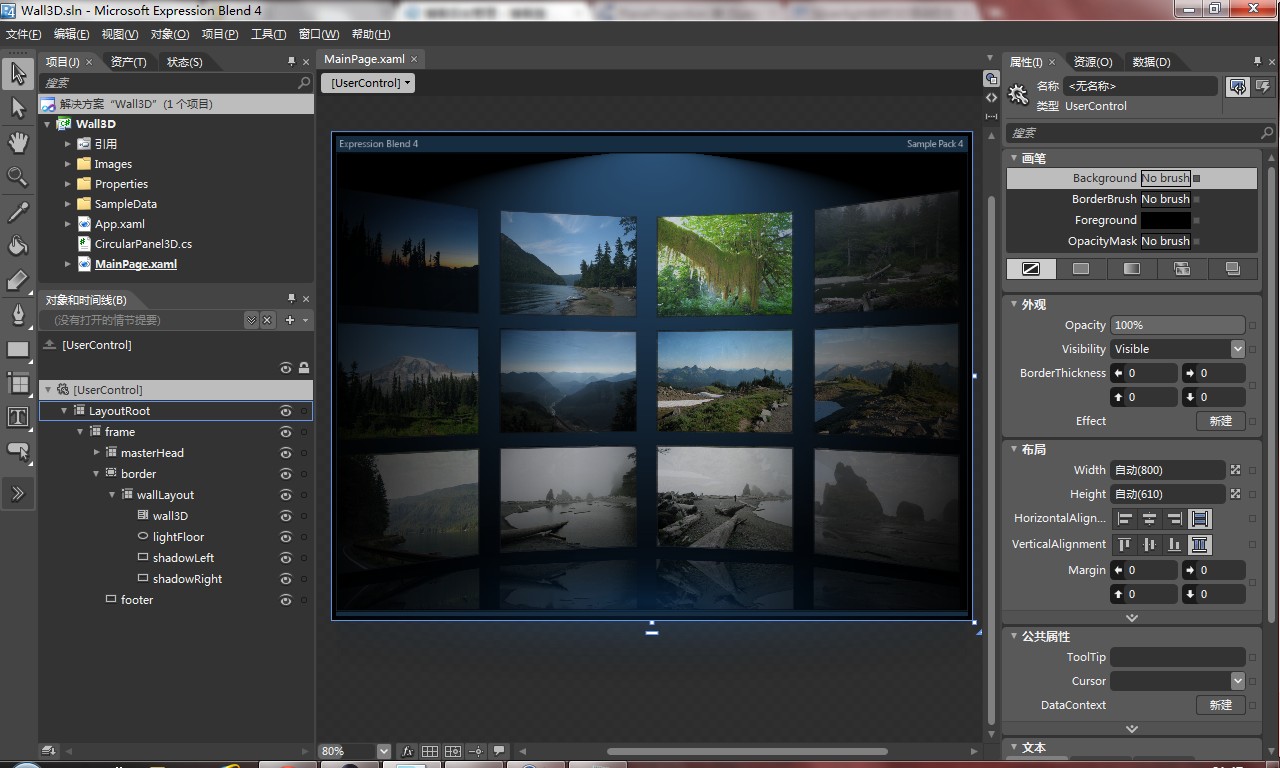
大家不要被这个可以流畅滚动的 3D 图片墙所迷惑,其实这只是一个 ListBox 控件。MainPage 中给 ListBox 定义了一个 ItemsPanelTemplate,使用新的控件来作为 ListBox 中 Items 的布局控件,这个控件就是这个项目最核心的类:CircularPanel3D。
CircularPanel3D 类继承自 System.Windows.Controls.Panel,它实现了一种新的布局方式,效果大家在上一张图片中都看到了。这种华丽的效果实际上都是由这个最重要的类中的最重要的方法: private void Refresh() 完成的。
private void Refresh()
{
    //几个计数器,看名字就功能很明了
    int count = 0;
    int col = 0;
    int row = 0;
    int zLevel = 0;

    //开始遍历子元素
    foreach (FrameworkElement childElement in this.Children)
    {
        //AngleItem是指单个元素的旋转角度,算法是360除以列数
        //这个方法的布局方式是先布满一圈,再下一环的,角度总是可以取模的
        //所以这边直接AngleItem和count相乘了
        //InitialAngle这个属性是用来确定整个圆环的偏转角度的,每次这个依赖属性变化就会重新计算布局(调用这个方法)
        double angle = (this.AngleItem * count++) - this.InitialAngle;
        //下面两个变量用来确定元素在屏幕上的位置,用到了三角函数,数学不好的请问高中数学老师
        double x = this.Radius * Math.Cos(Math.PI * angle / 180);
        double z = this.Radius * Math.Sin(Math.PI * angle / 180);
        //创建个PlaneProjection对象,并赋值
        PlaneProjection projection = new PlaneProjection();
        if (projection != null)
        {
            projection.CenterOfRotationX = 0.5;
            projection.CenterOfRotationY = 0.5;
            projection.CenterOfRotationZ = 0.5;
            projection.RotationY = angle + 90;
            projection.GlobalOffsetX = x;
            //Distance实际上就是模拟的镜头距离
            projection.GlobalOffsetZ = z - this.Distance;
            //-330。。。坑爹的硬编码,实际上就是两行元素的间距,OffsetY是纵向的偏移量,用于调整环在屏幕上的位置
            projection.GlobalOffsetY = row * (-330) + this.OffsetY;
        }
        //实际上是让double数变成int数,但是又不会丧失区别性,下面要用到
        int depth = (int)(z * 100);

        double pDist = (this.Distance - 1000) / 2000;
        double pZ = ((z + 1000) / 2000) + 0.5;

        //让太远的和太近的变透明
        double opacity = (pZ - pDist) + 0.4;
        if (opacity >= 1)
        {
            childElement.Opacity = (2 - opacity);
        }
        else if (opacity < 0)
        {
            childElement.Opacity = 0;
        }
        else
        {
            childElement.Opacity = opacity;
        }

        // 嗯这边有原版的英文注释,不解释
        // Variable zLevel changes value of ZIndex for each item in the ListBox.
        // This way the reflex of elements at the top will be placed behind the item below it.
        Canvas.SetZIndex(childElement, depth - (++zLevel * 10));

        //根据Align属性设置对齐方式,不是很重要
        double alignX = 0;
        double alignY = 0;
        switch (this.Align)
        {
            case AlignmentOptions.Left:
                alignX = 0;
                alignY = 0;
                break;
            case AlignmentOptions.Center:
                alignX = childElement.DesiredSize.Width / 2;
                alignY = childElement.DesiredSize.Height / 2;
                break;
            case AlignmentOptions.Right:
                alignX = childElement.DesiredSize.Width;
                alignY = childElement.DesiredSize.Height;
                break;
        }
        //将PlaneProjection对象赋给子元素的Projection属性
        childElement.Projection = projection;
        //定位子元素
        childElement.Arrange(new Rect(this.Width / 2 - alignX, this.Height / 2 - alignY, childElement.DesiredSize.Width, childElement.DesiredSize.Height));

        //换行,又见坑爹的硬编码14。。这个代表有十四列
        col++;
        if (col > 14)
        {
            col = 0;
            row++;
        }
    }
}