Nginx for Windows的安装和配置
今天收到Twilio的API安全更新通知邮件,Twilio将会禁用老版本的TLS加密套件,并推荐TLS 1.2以确保安全性。
用Chrome打开我们项目中用到的Twilio页面,在Devtools中的Security标签中发现如下提示信息:
Connection – obsolete connection settings
The connection to this site uses TLS 1.0 (an obsolete protocol), ECDHE_RSA with P-256 (a strong key exchange), and AES_256_CBC with HMAC-SHA1 (an obsolete cipher).
下面将通过编辑注册表来在Windows Server 2008 R2中启用TLS 1.2安全性。
启用TLS 1.2
- 备份相关的注册表设置
- 运行
regedit打开注册表编辑器,展开到[HKEY_LOCAL_MACHINE\SYSTEM\CurrentControlSet\Control\SecurityProviders\SCHANNEL\Protocols] - 修改注册表启用TLS 1.1和TLS 1.2
- 在Protocols下添加TLS 1.1和TLS 1.2的Key
- 分别在TLS 1.1和TLS 1.2下面创建Client和Server两个Key
- 分别在Client和Server下添加两个DWORD值:
DisabledByDefault [Value = 0],Enabled [Value = 1],最终结果如下:
[HKEY_LOCAL_MACHINE\SYSTEM\CurrentControlSet\Control\SecurityProviders\SCHANNEL\Protocols\TLS 1.1 ]

[HKEY_LOCAL_MACHINE\SYSTEM\CurrentControlSet\Control\SecurityProviders\SCHANNEL\Protocols\TLS 1.1 \Client]
"DisabledByDefault"=dword:00000000
"Enabled"=dword:00000001

[HKEY_LOCAL_MACHINE\SYSTEM\CurrentControlSet\Control\SecurityProviders\SCHANNEL\Protocols\TLS 1.1 \Server]
"DisabledByDefault"=dword:00000000
"Enabled"=dword:00000001

[HKEY_LOCAL_MACHINE\SYSTEM\CurrentControlSet\Control\SecurityProviders\SCHANNEL\Protocols\TLS 1.2]

[HKEY_LOCAL_MACHINE\SYSTEM\CurrentControlSet\Control\SecurityProviders\SCHANNEL\Protocols\TLS 1.2\Client]
"DisabledByDefault"=dword:00000000
"Enabled"=dword:00000001

[HKEY_LOCAL_MACHINE\SYSTEM\CurrentControlSet\Control\SecurityProviders\SCHANNEL\Protocols\TLS 1.2\Server]
"DisabledByDefault"=dword:00000000
"Enabled"=dword:00000001- 如果在Protocols下面发现有旧版TLS和SSL,可以像如下一样修改将DisabledByDefault和Enabled设为0
[HKEY_LOCAL_MACHINE\SYSTEM\CurrentControlSet\Control\SecurityProviders\SCHANNEL\Protocols\SSL 2.0\Client]
"DisabledByDefault"=dword:00000000
"Enabled"=dword:00000000

[HKEY_LOCAL_MACHINE\SYSTEM\CurrentControlSet\Control\SecurityProviders\SCHANNEL\Protocols\SSL 2.0\Server]
"DisabledByDefault"=dword:00000000
"Enabled"=dword:00000000- 重启计算机
更新加密套件(Cipher Suites)
重启后刷新页面,这时在Devtools中的Security标签中提示加密套件过时了:
Connection – obsolete connection settings
The connection to this site uses TLS 1.2 (a strong protocol), ECDHE_RSA with P-256 (a strong key exchange), and AES_256_CBC with HMAC-SHA1 (an obsolete cipher).
在Twilio的API安全更新通知邮件中推荐使用如下的加密套件:
TLS 1.2:
TLS_ECDHE_RSA_WITH_AES_256_GCM_SHA384
TLS_ECDHE_RSA_WITH_AES_256_CBC_SHA384
TLS_ECDHE_RSA_WITH_AES_256_CBC_SHA
TLS_ECDHE_RSA_WITH_AES_128_GCM_SHA256
TLS_ECDHE_RSA_WITH_AES_128_CBC_SHA256
TLS_ECDHE_RSA_WITH_AES_128_CBC_SHATLS 1.1:
TLS_ECDHE_RSA_WITH_AES_256_CBC_SHA
TLS_ECDHE_RSA_WITH_AES_128_CBC_SHA
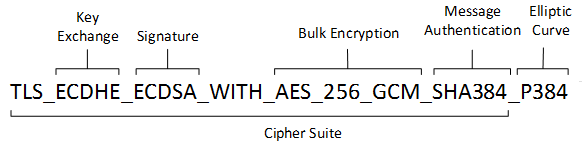 Tips: 加密套件字符串的定义
安装KB3042058即可更新Windows Server 2012 R2 中加密密码套件优先级。
